2023,江端さんの技術メモ

https://teratail.com/questions/8xzab7sat8gujj#reply-3jfh5txotuqxqb

の質問サイトに投げたものですが、ローカルでも作っておきます。

実現したいこと

TLS対応にしているGo言語のサーバを、Dockerコンテナの中から使えるようにしたい

前提

GO言語を使ってサーバを作っています。これらのサーバをDockerコンテナに格納して、運用しやすくしたいと考えております。

発生している問題・エラーメッセージ

Dockerコンテナに格納すると、https(×http)通信が使えません。

cert.pem、key.pemを使わない場合、http://127.0.0.1:18888で、ブラウザに"hello"メッセージがされますが、cert.pem、key.pemを使ってhttps://127.0.0.1:18888とした場合、「このサイトにアクセスできません」と表示されます。

該当のソースコード

GO言語

package main

import (
	"flag"
	"fmt"
	"log"
	"net/http"
	"net/http/httputil"
	"os"
)

var url_host string

func handler(w http.ResponseWriter, r *http.Request) {
	dump, err := httputil.DumpRequest(r, true)
	if err != nil {
		http.Error(w, fmt.Sprint(err), http.StatusInternalServerError)
		return
	}
	fmt.Println(string(dump))
	fmt.Fprintf(w, "<html><body>hello</body></html>\n")
}

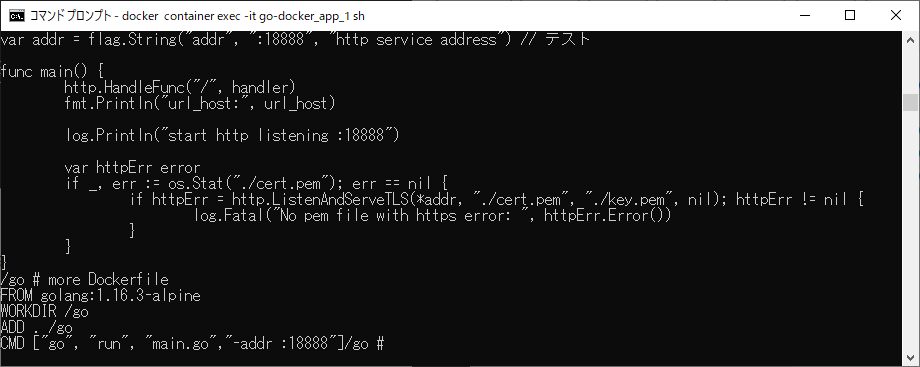
var addr = flag.String("addr", "127.0.0.1:18888", "http service address") // テスト

func main() {
	http.HandleFunc("/", handler)
	fmt.Println("url_host:", url_host)

	log.Println("start http listening :18888")

	var httpErr error
	if _, err := os.Stat("./cert.pem"); err == nil {
		if httpErr = http.ListenAndServeTLS(*addr, "./cert.pem", "./key.pem", nil); httpErr != nil {
			log.Fatal("No pem file with https error: ", httpErr.Error())
		}
	}
}

ちなみに、cert.pemと、key.pemは、"127.0.0.1","localhost"で通るように作ってあります。

https://wp2.fem.jp/%e6%b1%9f%e7%ab%af%e3%81%95%e3%82%93%e3%81%ae%e6%8a%80%e8%a1%93%e3%83%a1%e3%83%a2/6990/

Dockerfile
#FROM golang:apline
FROM golang:1.16.3-alpine
WORKDIR /go
ADD . /go
CMD ["go", "run", "main.go"]

docker-compose.yml

version: '3'
services:
  app:
    build: .
    ports:
      - "18888:18888" # "ホストのポート:コンテナのポート"

試したこと

上記のmain.go のfunc main()を以下のようにしている場合は,http(×https)で通信できます。

func main() {
    var httpServer http.Server
    http.HandleFunc("/", handler)
    log.Println("start http listening :18888")
    httpServer.Addr = ":18888"
    log.Println(httpServer.ListenAndServe())
}

補足情報(FW/ツールのバージョンなど)

■Windows10上のDocker for Windowsを使用しています。
■Dockerコンテナを使わないで、 windowsのコマンドプロンプトから起動する場合は、"https://127.0.0.1:18888"は問題なく起動します。

で、頂いたご回答が以下の通り。

Dockerfile

#FROM golang:apline
FROM golang:1.16.3-alpine
WORKDIR /app
ADD . /app
CMD ["go", "run", "main.go", "-addr", ":18888"]

と最後の一行を、CMD ["go", "run", "main.go", "-addr", ":18888"]

とするだけでした。

で、以外な盲点が、

ブラウザのキャッシュを消去しないと、変更がブラウザに反映されない

だったりします。(何度も経験しているのに、これをよく忘れるんだよなぁ)

感想

散々、色々試したあげく、最初に頂いた、Dockerfileの内容に変更することで、無事問題を解決することができました。現在、Dockerの中で立ち上げたgoのサーバに対して、https://localhost:18888で表示されることを確認しました。

今後のサーバ立ち上げに関して、かなり有益な知見となりました(実サーバ運用では、ご指摘の内容を反映してリスクを回避したいと思います)。 この度は、誠にありがとうございました。

以上

未分類

ありふれているけど、いつの時でも頭を抱える状況に、今回も頭を抱えています。

It's common, however, it has made me annoyed, and I am annoyed now.

今回は、chkdskでも、復旧できませんでした。

This time, "chkdsk" didn't save me.

https://wp2.fem.jp/%e6%b1%9f%e7%ab%af%e3%81%95%e3%82%93%e3%81%ae%e5%bf%98%e5%82%99%e9%8c%b2/post-3044/

各種の市販ツールも試してみたのですが、ダメでした。

I tried various commercial tools, but they were in vain.

2021/12,江端さんの技術メモ

■Windows Updateの後は、絶対にWindows Defenderの設定をしなおせ

■Windows Updateがなくても、「重い」と思ったら、Windows Defenderの設定を見ろ → 勝手に設定されているぞ

昨日から「Windows10が重くて使えない」という状態が続くので、タスクマネージャーを見てみたら、Antimalware Service Executableのメモリ消費量がシャレにならないくらい大きいことが分かりました。

メモリ/ディスクを使用する重いAntimalware Service Executableの対処法【停止も】

対処2: Windows Defenderのタスクスケジューラで設定を変更する

  1. 「Windowsマーク」をクリックし、「Windows管理ツール」→「タスクスケジューラ」の順にクリックします。
  2. タスクスケジューラの画面が表示されたら、左ペインで「タスクスケジューラライブラリ」をクリックしてツリーを展開します。
  3. 「Microsoft」→「Windows」→「Windows Defender」の順に展開します。
  4. 「Windows Defender」を選択して、右側にある「Windows Defender Scheduled Scan」をダブルクリックします。
  5. 画面が表示されたら「全般」タブを選択します。
  6. 画面下部にある「最上位の特権で実行する」のチェックを以下の4つの項目全部で外します。(つまり、以下の処理を項目ごとに、全部で4回やる、ということです)
  7. 「最上位の特権で実行する」のボタンが押せないので、「プロパティ」を押す

    ここからチェックを外す

  8. 「OK」をクリックします。

とりあえず、これで「Windows10が重くて使えない」状態は解消できるようになりました。


ノートPCも恐しく遅くて使えないので、この方法を試しました。現在、ちんたらと再起動処理をしているようですので、多分改善すると思います。

あやうくノートPCを廃棄してしまうところでした。


2023,江端さんの技術メモ

1 目的

すぐに環境やらコード(の場所)やらを忘れるので、自分の為にメモを残す

2 簡単なfastapiの環境とコード

私の環境では、c:\users\ebata\fastapi1,2,3,4,5あたりにある。

2.1. 最新のPIPをアップグレードする

> pip install --upgrade pip
> python -m pip install --upgrade pip
> python3 -m pip install --upgrade pip

のいずれかでできる。

2.2. uvicorn, fastapi, pydantic, pandas, requests, jsonのモジュールをインストールする

> pip3 install fastapi
> pip3 install uvicorn[standard]

は必須だが、後はプログラムを動かせば、プログラムの方から、インストールを指示されると思うので大丈夫(だろう)。

2.3. uvicornを起動する

> uvicorn index:app --reload

これで、自動的に"index.py"が動き出す。

2.4. クライアントを起動する

> python request.py

で、起動を確認する。

以上

3. ソースコード

3.1. index.py

# https://miseruit.com/2022/07/18/post-2939/

from fastapi import FastAPI
from pydantic import BaseModel
import pandas

class Item(BaseModel):
    ID: str
    Name: str
    Class: str

app = FastAPI() #インスタンスを作成

User_list =[
    {"ID":"M001","Name":"Takashi","Class":"A"},
    {"ID":"M002","Name":"Hanako","Class":"A"},
    {"ID":"M003","Name":"Hiroshi","Class":"B"},
    {"ID":"M004","Name":"Kyoko","Class":"B"},
    ]

# joson_normalize関数を用いてJsonデータをDataFrame型に変換します。
df = pandas.json_normalize(User_list)

# Get /Users/ : 全件取得
# Get /Users/{ID} :特定のIDのみ取得
# POST /Users/ :ユーザの登録
# DELETE /Users/{ID} :ユーザの削除

# curl http://localhost:8000/Users/
@app.get("/Users/")
async def users():
    return User_list

# curl http://localhost:8000/Users/M003
@app.get("/Users/{u_id}")
async def users(u_id:str):
    return list(filter(lambda item : item['ID']==u_id, User_list))

# Windowsの場合 
# {"ID":"M005","Name":"Aya","Class":"C"}]を追加する
# curl -X POST -H "accept: application/json" -H "Content-Type: application/json" -d "{\"ID\":\"M005\", \"Name\":\"Aya\", \"Class\":\"C\"}" http://localhost:8000/Users/

@app.post("/Users/")
async def users(user: Item):
    User_list.append({"ID": user.ID,"Name":user.Name,"Class":user.Class})
    return User_list

# curl -X DELETE -H "accept: application/json" http://localhost:8000/Users/M003
@app.delete("/Users/{u_id}")
async def users(u_id:str):
    global df
    df = df.drop(df.index[df["ID"]==u_id])
    return df.to_json(orient='records')

3.2. request.py

import requests
import json

# テスト
#url = 'https://wp2.fem.jp/'
#response = requests.get(url)
#print(response.text)

#print()

print("-----start of get(1)")

# curl http://localhost:8000/Users/ と同じ機能を実施
r = requests.get('http://localhost:8000/Users/')

print(r.url)
print(r.status_code)
print(r.text)
print(r.json())

print("-----end of get(1)")

print()

# curl http://localhost:8000/Users/M003 と同じ機能を実施

print("-----start of get(2)")

r = requests.get('http://localhost:8000/Users/M003')

print(r.url)

print(r.status_code)
print(r.text)
print(r.json())
print("-----end of get(2)")

print()
print("-----start of delete")
# curl -X DELETE -H "accept: application/json" http://localhost:8000/Users/M003と同じ機能を実施
r = requests.delete('http://localhost:8000/Users/M003')

print(r.url)

print(r.status_code)
print(r.text)
print(r.json())

print("-----end of delete")
print()

# curl -X POST -H "accept: application/json" -H "Content-Type: application/json" -d "{\"ID\":\"M005\", \"Name\":\"Aya\", \"Class\":\"C\"}" http://localhost:8000/Users/ と同じ機能を実現
# {"ID":"M005","Name":"Aya","Class":"C"}]を追加する

headers = {'Accept': 'application/json', 'Content-Type': 'application/json'}
json_payload = '{"ID":"M005","Name":"Aya","Class":"C"}'  # ここで100回くらいのパターンを試したぞ

print("headers:",headers)
print("payload:",json_payload)

#r = requests.post('http://localhost:8000/Users/',headers=headers, params=payload)
#r = requests.post('http://localhost:8000/Users/', headers=headers,params=json.loads(payload))
r = requests.post('http://localhost:8000/Users/', headers=headers, data=json_payload)

print(r.url)

print(r.status_code)
print(r.text)
print(r.json())

2023,江端さんの技術メモ

結論から先に言うと

json_payload ='{"ID":"M005","Name":"Aya","Class":"C"}'
'"が付いているかどうか、だったというオチでした。

https://wp2.fem.jp/%e6%b1%9f%e7%ab%af%e3%81%95%e3%82%93%e3%81%ae%e6%8a%80%e8%a1%93%e3%83%a1%e3%83%a2/post-9960/

のように、pythonでFastAPIを使って、外部と内部のインターフェースのテンプレートを作るというのが、目下の課題でした。
多くのサンプルプログラムがあったのですが、私はhttpのGET/POSTができれば十分だったので、他のことは忘れて、そのポイントのみに絞って、ネットを探し回りました。
まずは、FastAPIを受ける側(サーバと言えるのかな)のプログラムは、

Python | FastAPIでAPI作成 ~その6:DELETEでデータ削除 & Pandas活用

を参考(というかコピペ)させて頂きました。

以下のコードを、私の場合はC:\Users\ebata\fastapi4に、index.pyという名前で置きました。
# https://miseruit.com/2022/07/18/post-2939/

from fastapi import FastAPI
from pydantic import BaseModel
import pandas

class Item(BaseModel):
    ID: str
    Name: str
    Class: str

app = FastAPI() #インスタンスを作成

User_list =[
    {"ID":"M001","Name":"Takashi","Class":"A"},
    {"ID":"M002","Name":"Hanako","Class":"A"},
    {"ID":"M003","Name":"Hiroshi","Class":"B"},
    {"ID":"M004","Name":"Kyoko","Class":"B"},
    ]

# joson_normalize関数を用いてJsonデータをDataFrame型に変換します。
df = pandas.json_normalize(User_list)

# Get /Users/ : 全件取得
# Get /Users/{ID} :特定のIDのみ取得
# POST /Users/ :ユーザの登録
# DELETE /Users/{ID} :ユーザの削除

# curl http://localhost:8000/Users/
@app.get("/Users/")
async def users():
    return User_list


# curl http://localhost:8000/Users/M003
@app.get("/Users/{u_id}")
async def users(u_id:str):
    return list(filter(lambda item : item['ID']==u_id, User_list))


# Windowsの場合 
# {"ID":"M005","Name":"Aya","Class":"C"}]を追加する
# curl -X POST -H "accept: application/json" -H "Content-Type: application/json" -d "{\"ID\":\"M005\", \"Name\":\"Aya\", \"Class\":\"C\"}" http://localhost:8000/Users/

@app.post("/Users/")
async def users(user: Item):
    User_list.append({"ID": user.ID,"Name":user.Name,"Class":user.Class})
    return User_list

# curl -X DELETE -H "accept: application/json" http://localhost:8000/Users/M003
@app.delete("/Users/{u_id}")
async def users(u_id:str):
    global df
    df = df.drop(df.index[df["ID"]==u_id])
    return df.to_json(orient='records')
このプログラムは、メモリ上の名簿を検索(GET)、追加(POST)、削除(DELETE)するものです。

C:\Users\ebata\fastapi4> uvicorn index:app --reload

で起動します。
多分、プログラムの方から、「pipでxxxxを入れろ」と文句を言ってきますので、大人しく従います。
プログラム中に記載されている、curlのコマンドを使うとFastAPIの動作を確認できます。
さて、このプログラムで基本動作は確認できますが、基本的にクライアントのプログラムの叩き台がなければ、使えません。モジュールプログラムの中から、curlのコマンドを発行しろというのも乱暴な話です。
ですので、サクッとクライアント(というかFastAPIのアクセス用のテストプログラム)を作成してしまうと思ったのですが、ここで嵌りました。
先ずは、以下のコードをrequest.pyという名前で、C:\Users\ebata\fastapi4に置きました。
(以下のファイルは、動きたてのコードを修正せずに、汚いままで展開しています)
import requests
import json

# テスト
#url = 'https://wp2.fem.jp/'
#response = requests.get(url)
#print(response.text)

#print()

print("-----start of get(1)")

# curl http://localhost:8000/Users/ と同じ機能を実施
r = requests.get('http://localhost:8000/Users/')

print(r.url)
print(r.status_code)
print(r.text)
print(r.json())


print("-----end of get(1)")

print()

# curl http://localhost:8000/Users/M003 と同じ機能を実施

print("-----start of get(2)")

r = requests.get('http://localhost:8000/Users/M003')

print(r.url)

print(r.status_code)
print(r.text)
print(r.json())
print("-----end of get(2)")


print()
print("-----start of delete")
# curl -X DELETE -H "accept: application/json" http://localhost:8000/Users/M003と同じ機能を実施
r = requests.delete('http://localhost:8000/Users/M003')

print(r.url)

print(r.status_code)
print(r.text)
print(r.json())

print("-----end of delete")
print()


# curl -X POST -H "accept: application/json" -H "Content-Type: application/json" -d "{\"ID\":\"M005\", \"Name\":\"Aya\", \"Class\":\"C\"}" http://localhost:8000/Users/ と同じ機能を実現
# {"ID":"M005","Name":"Aya","Class":"C"}]を追加する

headers = {'Accept': 'application/json', 'Content-Type': 'application/json'}
json_payload = '{"ID":"M005","Name":"Aya","Class":"C"}'  # ここで100回くらいのパターンを試したぞ

print("headers:",headers)
print("payload:",json_payload)

#r = requests.post('http://localhost:8000/Users/',headers=headers, params=payload)
#r = requests.post('http://localhost:8000/Users/', headers=headers,params=json.loads(payload))
r = requests.post('http://localhost:8000/Users/', headers=headers, data=json_payload)

print(r.url)

print(r.status_code)
print(r.text)
print(r.json())
で、
C:\Users\ebata\fastapi4> python request.py
にて、GETとDELETEは問題なくサクっと動いたのですが、POSTだけが思うように動かない
{'detail': [{'loc': ['body'], 'msg': 'value is not a valid dict', 'type': 'type_error.dict'}]}
{"detail":[{"loc":["body"],"msg":"field required","type":"value_error.missing"}]}
エラー番号422
やらが、ワラワラと出てきて、頭を抱えました。
色々検索して調べると『こうやればいい』というアドバイスだけして、サンプルコード(1行で足る)を残さない奴が、世界中には山ほどいます(アドバイスではなく、コードを残して欲しい)。
のコードを真似て、ようやく動かすことができました(本当に助かりました)。
とりあえず、これでサーバとクライアントの対(つい)が完成し、実プログラムに展開できる準備ができたと思います。

以上

2023,江端さんの忘備録

本日、リモート環境で打ち合わせをしている最中に、比較的大きめの地震が発生しました。

During a remote meeting, a relatively big earthquake occurred.

が、打ち合わせはそのまま問題なく進んでいるので、『いちいち地震を気にしないで会議を進めるのだ』と思っていました。

However, the meeting continued without any trouble, I thought "They don't care about earthquakes"

ところが、3秒くらい経過したところで、「あ、揺れている」「比較的大きいですね」という声がチラホラ聞こえてきました。

After about three seconds, the voice "Oh, it's shaking," or "It's relatively big" were coming, so I thought

―― 生れてはじめて、地震波の存在をリアルに実感した

"For the first time in my life, I really felt the existence of earthquake waves"

と思いました。

https://wp2.fem.jp/%e6%b1%9f%e7%ab%af%e3%81%95%e3%82%93%e3%81%ae%e5%bf%98%e5%82%99%e9%8c%b2/post-356/

-----

ただ、Twitterで震源地情報などを調べると、どうも、違和感がある。

However, I felt a sense of discomfort, when I looked up the epicenter on Twitter.

私の住んでいるところが、一番震源地より遠いはずです。

My location must be far from the epicenter, I thought.

私の考えた、仮説の一つは、『他の人の(高価な)家は免震構造が頑強であるが、私の(高価でない)家は敏感にP波(初期微動)を感じられる』です。

One of my hypotheses is that "other member's houses are expensive and robust seismic isolation structures, but my house is not expensive and can feel P-waves (initial microtremors) sensitively.

あまり愉快な仮説ではありませんが。

Anyway, it is not a very pleasant hypothesis.

未分類

なんでこれが

FROM golang:1.16.3-alpine
WORKDIR /go
ADD . /go
# CMD ["go", "run", "main.go","-addr" ":18888"]
# CMD ["main.exe"]

こうなる?

わからん・・・

2023,江端さんの忘備録

私は、自分のWebサイトをDB化しています ―― GoogleエンジンとWordPressの検索機能を使っているだけですが。

I use my website as DataBase, using just the Google search engine and search functions of WordPress.

これ結構便利です。

This is really useful.

「○○についてネタが欲しい」と思った時に、すぐに探し出せるからです。

Whenever I want to tell a story about a specified theme, I can find it soon.

https://wp2.fem.jp/江端さんの忘備録/post-10362/

-----

今日も会社で、あるテーマについて投稿しなければならなかったのですが、数秒でネタを見つけました。

Today I was ordered to submit a short story about a specific theme, and I could find it in a few seconds.

まあ、ネタの使い回しもあるので、何度も同じ話を聞かされている人もいるでしょうが ―― まあ、そこは、諦めて下さい。

Well some people should hear my story again and again, I ask them to give up.

-----

なんだかんだ言って、私のWebの創立は、1993年です ―― 創業30年の老舗Webサイトです。

Anyway, my Web establishment was founded in 1993 -- a 30-year old Web site.

まあ、規模的には「和菓子屋」というよりは「駄菓子屋」ですが ――

Well, in terms of scale, it's more of a "candy store" than a "wagashi ya" -- however,

それでも歴史だけに着目すれば、AmazonやGoogleなどのGAFAなんぞは、小僧のようなものです。

Still, if you focus only on history, GAFAs like Amazon and Google are like little boys.

決して、負け惜しみではありません。

By no means is this a sore loser?

2009,江端さんの忘備録

「NHKスペシャル 十月の悪夢―1962年キューバ危機・戦慄の記録 (NHKスペシャル)」注文してしまいました。

ですから、私は今年は、飲み会に出ません。

年齢傾斜配分を使った支払いであれば、100%出席しません。

-----

私が飲み会に出席するモチベーションは、「エッセイのネタを拾えるかどうか」です。

上司の悪口、会社の体制批判、誰ぞの結婚話などという陳腐な話題で構成される、退屈で愚劣な飲み会などには興味はありません。

最近、参加して、『元を取ったな』と思われるネタ提供には、以下のようなものがありました。

○我が社を宗教法人化して、現在の研究所を「宗教研究所」とする構想。

『技術で社会に貢献するH社』から、『宗教で社会に貢献するH社』への定款の変更。

研究所のそれぞれの部は、例えば、「第1部 人工知能研究ユニット」は、「イスラム教部、シーア派ユニット」、「第6部 ユビキタス端末ユニット」は、「仏教部 祭典仏具部開発ユニット」と、研究内容を変更。

それぞれのユニットが原理主義を掲げて、他のユニットに宗教戦争をしかけないように、現在の「総務部 管理部門」が、政教分離を規範とした「思想自衛団」を担当。

と、まあ、この程度のネタを提供してくれる飲み会であるなら、傾斜配分の支払いを認容する準備があります。

-----

という訳で、私は静かに刺身を摘みながら、課全員の、「ネタ提供力」を、きっちり見ています。

「ネタ」に新規性や進歩性がない若い研究員の査定は、相当下ります。

# ボーナスや昇進には何の影響もありませんが。

閑話休題

-----

Amazonってやっぱり凄いと思うんですよ。

私がこのDVDの予約を完了した段階で、お勧めリストに出てきたDVDが、

『ニュールンベルグ裁判 [DVD]』

うーん、なんでここまで判ってしまうのか。

衝動買いの衝動抑えるのに、どんだけ大変か。

しかも、あの『東京裁判(DVD)』を私が所有しているのかを、まるで知っているかのように、その広告は打ってこない。

おそるべし、Amazonのピンポイントターゲティング広告能力。

この分野の研究は『撤収』が正しいと思いますが、いかがでしょうか。弊社の方々。

2023,江端さんの忘備録

昨日書いたようなデッドロックに、本日、遭遇することになりました。

https://wp2.fem.jp/%e6%b1%9f%e7%ab%af%e3%81%95%e3%82%93%e3%81%ae%e5%bf%98%e5%82%99%e9%8c%b2/post-10348/

Today, I faced the "Dead Lock" I wrote yesterday.

だいたいヤバいことは、システムをいじった直後に発生するというのは「お約束」です。

Almost all of the troubles will happen just after the system modification. This is so typical.

-----

で、このデッドロック対策について、教えを乞い、100ページのマニュアルを送ってもらったのですが、「もうダメだ」と諦めました。

In order to avoid the deadlock, I asked workers in my company. A guy gave me a manual book with more than 100 pages. After reading it, I gave up easily.

しかし、その人から『簡単ですよ』と言われて、実際に試してみたら、ざっくり1分で設定が完了しました。

However, the guy gives a reply, "It was a piece of cake", I could complete the set in a minute

-----

ここから導かれる事実は2つ。

The facts lead to the following.

■マニュアルは、本当に欲しいことを、分からないように記載される傾向がある

- Manual books are apt to be written difficult, so too hard to get us what we want.

■人間(というか、私)は、マニュアルより、人間の言葉を信じる傾向にある

- A human being (like me) is apt to believe human words more than manuals.

ということです。

私も今回のメモを纏めましたが、「10行の文章 + 図面のハードコーピー2枚」になりました。

I made a memorandum about what I did, and the volumes are only 10 line-document and two hardcopy sheets.

-----

マニュアルがあんなに長く、分かりにくいのは、問題が発生した時に「問題」になるからです。

The reason why manuals are so long and hard to read is to become a problem if the problem happens.

一方、私のメモは私の為のものなので、他の人がそれを読んでシステムを壊すなどの被害が起ったところで ―― 私の、知ったことではありません。

On the other hand, my memorandum is just for me, so even if someone tries some actions by reading my memorandum, it is not my business.

私だって、他の人のメモで、色々酷い目にあったこともあります ―― これは『お互い様』です。

Even I also got in terrible trouble by reading another's memorandum. So It is "mutual"

まあ、普通の企業には、恐しくてとてもできないことだとは思いますが。

Well, I think it is something that ordinary companies are too afraid to do.